Selection
A fundamental part of WorldEdit is working with a selection or region. For example, if you wanted to replace all the glass blocks inside a square area with dirt, you would have to tell WorldEdit where this square is. WorldEdit gives you several ways to select a region for editing, this section will introduce you to selecting regions and show you what you can do with them.
Want to see selection lines?
To see lines that show what you have selected, then you need to install WorldEditCUI, a client-side mod. Note that the mod requires Fabric, so you will need to install that first.
Note
If you would like to use an older version of Minecraft (1.12 or before), in addition to downloading an older WorldEdit (version 6), you will also need the older WorldEditCUI mod by Mumfrey. Note that this version requires LiteLoader (installation instructions on that page) instead of Fabric.
Tip
Don’t want to install client mods? You can access a limited version of the selection outlines server-side via the //drawsel command. It only works for cuboid selections less than 32x32x32 in size, and you must be in creative mode. These restrictions are due to how structure blocks work in Minecraft.
Selecting Cuboids
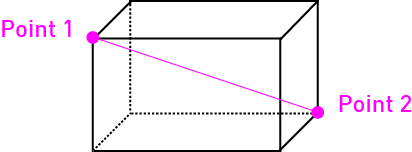
WorldEdit allows you to select cuboids (think a 3D rectangle) by choosing two points at two corners of the cuboid. The diagram below indicates how two points can form a cuboid. The cuboids you select can only be aligned to the world (they cannot be rotated at an angle).
Tip
You can also select other shapes such as 2D polygons, ellipsoids, spheres, cylinders, and more. Information on these other selection modes is described later in this page.
There are several different ways of choosing these two points and you can mix and match.
Selecting with the wand
//wand
The most intuitive way to select a region is by using wand. To get the wand, use //wand (it is, by default, a wooden axe). Left clicking a block with the wand marks that block as the first corner of the cuboid you wish to select. A right-click chooses the second corner.
You can bind the selection wand to a different item either by changing the configuration or using the //selwand command. In this regard, it is a tool.
Selecting at your own location
//pos1
//pos2
These commands set the first and second corners to the block above the one that you are standing on. Generally the wand suffices for most tasks and you likely will not need to use this. This is useful if you are flying in mid-air and don’t have blocks you can click with the wand.
Selecting with your crosshair
//hpos1
//hpos2
These commands set the first and second corners to the block that you are looking at. This allows you to select points from far away and make particularly large cuboid regions with ease.
Selecting the current chunk
//chunk
This command selects all the blocks in the chunk that you are standing in. Chunks are 16 by 16 and are 256 blocks high.
Using //chunk -s instead will select all chunks that your current selection intersects.
Adjusting the selection
Expanding the selection
//expand <amount> [direction]
//expand <amount> <reverse-amount> [direction]
//expand vert
This command allows you to easily enlarge a region in several different ways:
- By specifying a direction
- By looking in the direction (only for cardinal directions)
- To the sky and to bedrock (using
vert)
To specify a direction, use “N”, “S”, “W”, “E”, “U” (for up), or “D” (for down) for the direction. If you want to merely look in the direction, either use “me” for the direction or don’t enter a direction parameter.
You can also specify relative directions like “F” (forward, same as “me”), “B” (back), “L” (left), “R” (right) which will go be relative to the direction you are facing.
You can also specify multiple directions separated by commas to expand in multiple directions at once, such as //expand 10 n,w.
You can specify two numbers and the region will be expanded in two opposite directions simultaneously.
Example: Expanding upwards
For example, if you used //expand 10 up, the selection would grow larger at the top as shown. 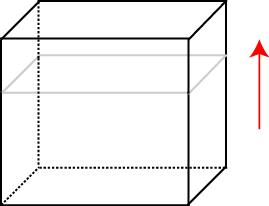
Contracting the selection
//contract <amount> [direction]
//contract <amount> <reverse-amount> [direction]
This command works similarly to //expand, but instead contract.
Example: Contracting downwards
Which way would the selection contract? If you used //contract 10 down, then the selection would shrink from the top. 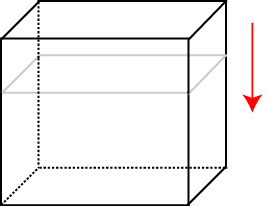
Inset and Outset
Tip
If you want to expand or contract in all directions at once (or just horizontal or vertical directions), you can use the //outset and //inset commands. For example, //outset -v 5 will expand your selection vertically (both up and down) 5 blocks each, while //inset -h 5 will contract your selection horizontally (north, west, south, and east) 5 blocks each. Leaving out the v or h will work in all 6 directions.
Selection Information
WorldEdit also provides you with commands for getting information about the area you have selected.
Getting selection size
//size [-c]
Gets the area and dimensions of your selection.
The -c flag will instead measure your clipboard size instead of your selection.
Counting block frequency
//count <mask>
Counts the number of blocks in your selection which match the mask.
Finding the block distribution
//distr [-cd]
Shows the block distribution in the selection area.
The -c flag operates on your clipboard instead of your selection.
The -d flag separates by block states instead of just types.
Example: Block distribution output
Only by block type:
75      (52.083%) Air (minecraft:air)
41      (28.472%) Grass Block (minecraft:grass_block)
18      (12.500%) Rose Bush (minecraft:rose_bush)
5       (3.472%) Grass (minecraft:grass)
Separating by states:
75      (52.083%) Air (minecraft:air)
41      (28.472%) Grass Block (minecraft:grass_block[snowy=false])
9       (6.250%) Rose Bush (minecraft:rose_bush[half=upper])
9       (6.250%) Rose Bush (minecraft:rose_bush[half=lower])
5       (3.472%) Grass (minecraft:grass)
Selection Modes
Using the //sel <mode> command allows you to change between different shapes. It is recommended to install the CUI mod when using more complex shapes so you can visualize what you’re selecting.
//sel cuboid
The standard cuboid selection mode, described above.
//sel extend
Left-click to select first point. All subsequent points are selected by right-clicking. Every right-click will extend the cuboid selection to encompass the new point.
//sel poly
Left-click to select first point. All subsequent points are selected by right-clicking. Every right-click will add an additional point. The top and bottom will always encompass your highest and lowest selected points.
//sel ellipsoid
Left-click to choose center, right-click to extend. You can control the radii along the x, y, and z planes individually depending on where you click.
//sel sphere
Left-click to select center, right-click to extend. Selection will always be a sphere from the first point which has a radius to the second point.
//sel cyl
Left-click to choose center, right click to extend. You can control the x and z radii, while the height will always encompass your highest and lowest points.
//sel convex
Left-click to select first point. All subsequent points are selected by right clicking. The selection is a convex hull encompassing all your selected points.
