Region Operations
Once you have selected a region, it’s time for the real fun to begin.
Setting Blocks
The most basic operation, the //set <pattern> command allows you to set all blocks in your selection to a given pattern.
Replacing Blocks
If you don’t want to set all the blocks in your selection, you can decide which ones should be affected by specifying a mask with the //replace [mask] <pattern> command.
Note that you can omit the mask argument in the command - it will default to the existing block mask.
Building walls (and other outlines)
Sometimes, you want to create walls or other hollow shapes. There are two main ways to do this:
For cuboid selections, the //faces <pattern> command (alias: //outline) will allow you to fill all 6 faces (up, down, north, south, east, west). Using this command on any other type of selection will create a bounding box (i.e. a cuboid region that entirely encompasses whatever shape you had selected) and create the faces of that cuboid.
For any type of selection, the //walls <pattern> command will allow you to make a hollow shell of the selection without a ceiling and floor. The specifics of this depends on the selection type.
Overlaying
The //overlay <pattern> command allows you to overlay blocks in the selection with another block (or pattern). Note that the top of your selection must be “open” - this command will look downwards from the block above your selection in every column until it hits a non-air block, and then place your pattern above that. This is useful for overlaying torches, fences/walls, road blocks, etc. on top of existing terrain.
Stacking
The //stack <count> [direction] command allows you to repeat your selection a number of times in a given direction. This will essentially copy and paste your selection over and over.
If a direction is not specified, it will stack in the direction you are facing.
Some potential uses for this include:
Extending bridges
Making tunnels
Repeating a segment of a hand-built structure
There are several flags available:
-m <mask>will set a source mask, only stacking matching blocks-ewill also copy entities into each stacked area-bwill also copy biomes into each stacked area (you may need to re-join the world to see changes)
Moving
//move <distance> [direction] [fill pattern]
If you’ve built something, only to find out that you need to move it a little to the side, this command can be very helpful as it will shift the entire area like magic. The command takes a distance to move the area, an optional direction, and also a block to fill with the existing area now left void by the move.
The direction parameter works like that of the //stack command: use any direction, defaulting to “me” - your current heading.
If you don’t provide a block to fill with, the area left behind will be filled with air.
You can also use the -s flag to move your selection along with the blocks, so your new selection will be in the same place as the moved blocks.
The move command also takes the same three flags as //stack, -e to move entities, -b to copy biomes (source biomes unaffected), and -m <mask> to move only matching blocks.
Smoothing
The //smooth [iterations] command will smooth terrain out. You can increase the number of iterations to make areas more smooth. Note that this command works with a heightmap, and while it excels at smoothing out surface terrain, it it not suitable for smoothing caves, walls, or objects.
Regenerating
The //regen command will regenerate your selection to its state when the world was freshly generated. It is based on the world’s current world generator and seed, meaning running it multiple times will produce the same results.
Warning
The regen command will use the current world generator, which means if the world was generated via an external tool, or if Minecraft’s terrain generation has changed in the meantime, the regenerated area will not match everything around it. If possible, consider taking a backup of your entire world ahead of time for use with snapshots.
Naturalizing
The //naturalize command will naturalize terrain by creating a layer of grass, followed by layers of dirt and then stone.
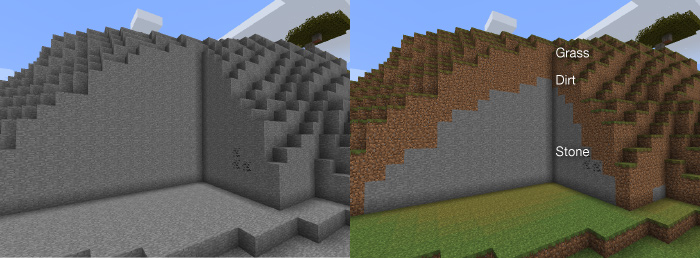
Making the land look natural.
Placing flora
The //flora command will scatter tall grass and flowers over grass, and cacti and dead grass on sand in your selection. It works similarly to overlay, if you need a more complex pattern.
Generating forests
The //forest <tree type> [density] command will plant a forest with trees of your choosing. The density must be a number between 0 and 100, and controls how often WorldEdit will try to plant a tree within the area. The default is 5.
Hollowing areas
Using //hollow [thickness] [fill pattern] command will hollow out objects in your selection, leaving a shell with the given thickness. By default, the interior of the hollowed object will be filled with air, unless you specify something else.
Creating lines and curves
When you have a cuboid region selected, you can draw a line between the first and second points you selected. The command //line <pattern> [thickness] will create a line of the given pattern and thickness, and adding the -h flag will make it hollow, allowing you to generate a “tube”.
To make a curve with more points, use the //sel convex selection mode to select multiple points. Then use //curve <pattern> [thickness] to draw a spline through all the points selected (in order!) of the given pattern and thickness - again, -h will make it hollow.
Setting a block in the center
The //center <pattern> command will set the center block (or 2 blocks, along any axis of even length) of your selection.
Deforming regions
Using //deform <expression>, you can apply a custom expression to all blocks in your selection.
The expression should take the variables x, y, and z and change them to the new coordinate that should be copied to the current x/y/z. For example, y-=1 will move every block up one, since each block will be copied from the block below it.
By default, coordinates are normalized from -1 to 1 on each axis, from the min to max points of your selection. Using the -r flag will use raw world coordinates, while -o will use Minecraft coordinates scale offset to your placement position.
Setting Biomes
While WorldEdit mostly focuses on manipulating blocks, the //setbiome <biome> command allows you to set the biome in your selection. The biome type should be specifed by biome id. If you are using a biome added by a mod, the namespace: must prefix the id, e.g. minecraft:plains.
Note
WorldEdit supports Minecraft’s 3D biomes since 7.2, on 1.15 and above. This means that for the most part, the biome will be set inside your selection only, even in the Y direction. Unfortunately, Mojang made biomes 4x4x4 cubes instead of 1x1x1 like blocks, and it also fuzzes on the edges. This means that biomes can’t be as finely controlled as before, and that it can’t be constrained to your selection entirely.
Additionally, until 1.18, Mojang made the overworld not entirely respect 3D biomes, so in some cases WorldEdit
will also set the biome at Y = 0 to ensure that spawning and visuals work properly.
To more closely emulate the old behavior of setting columns, use //expand vert before setting biomes.
